
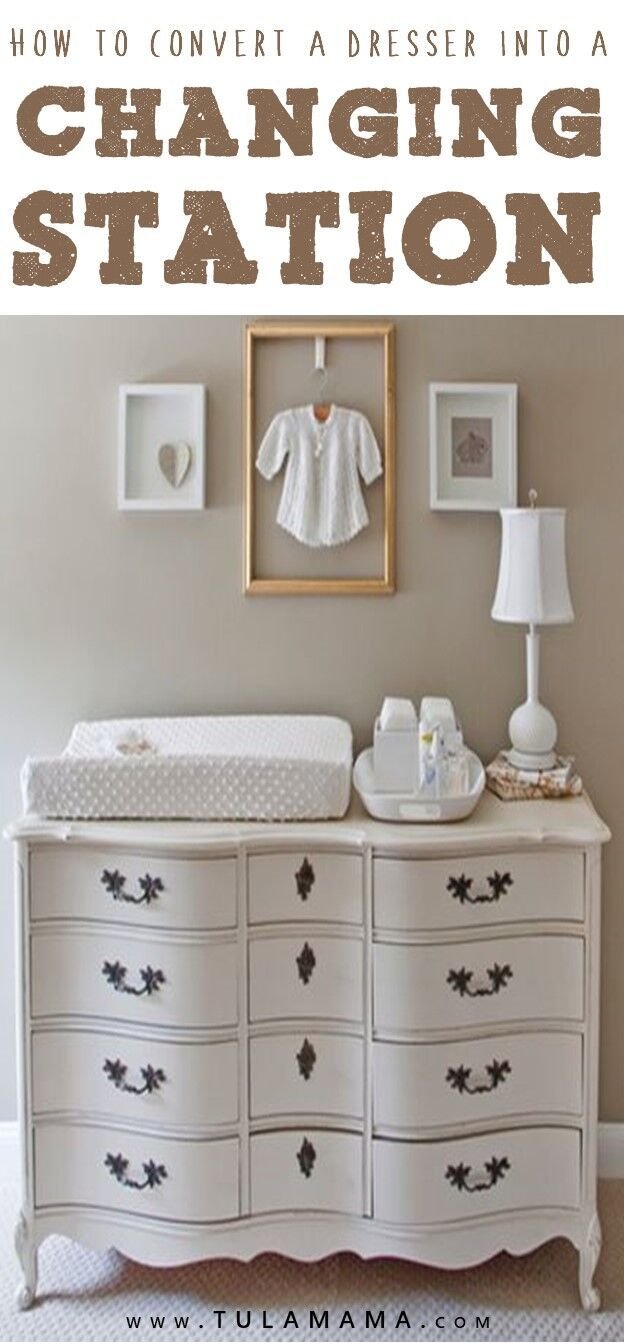
To easily convert a dresser into a changing table with drawers, start by removing any existing hardware & sanding down The surface. Measure The height of The changing pad you are using & mark The desired height on The dresser. Cut a hole in The top surface for The changing pad To fit into. Paint or stain The dresser To your desired color. Attach drawer dividers inside The drawers To keep baby essentials organized. Lastly, install safety straps on The sides of The dresser To secure The changing pad. Enjoy your custom-made changing table with plenty of storage space!
How To Easily Convert A Dresser Into A Changing Table With Drawers. Learn how To effortlessly transform your dresser into a functional changing table with drawers. This step-by-step guide will walk you through The process using simple language, so you can tackle this project with confidence.
How To Easily Convert A Dresser Into A Changing Table With Drawers
Introduction
Converting a dresser into a changing table with drawers is a practical & cost-effective solution for new parents. It allows you To repurpose a piece of furniture you already have, saving you money & reducing waste. Plus, having a changing table with built-in drawers provides convenient storage for all of your baby essentials. In this article, we will guide you through The process of converting a dresser into a changing table with drawers, providing step-by-step instructions & tips.
Gather Your Materials
Before you begin, gather The following materials:
- Dresser
- Changing pad
- Safety brackets
- Drawer dividers or organizers
- Hardware (screws, nuts, & bolts)
- Power drill
- Measuring tape
Step 1: Preparation
Start by removing any hardware or knobs from The dresser. This will make it easier To work with & ensure a clean surface for painting or staining. Sand down The dresser To smooth any rough spots. If desired, apply a fresh coat of paint or stain To match your nursery’s decor.
Step 2: Adding Safety Brackets
To ensure The changing table is secure & stable, add safety brackets To The back of The dresser. These brackets will anchor The dresser To The wall, preventing it from tipping over. Follow The manufacturer’s instructions To properly install The safety brackets.
Step 3: Installing The Changing Pad
Place The changing pad on top of The dresser, positioning it in The center. Use The provided straps or adhesive strips To secure The pad To The dresser. This will prevent The pad from shifting while you change your baby.
Step 4: Dividers & Organizers
If your dresser does not have built-in dividers or organizers in The drawers, now is The time To add them. Drawer dividers or organizers will help you keep essentials such as diapers, wipes, & creams neatly organized & easily accessible.
Step 5: Anchoring The Dresser To The Wall
For added safety, anchor The dresser To The wall. Use wall anchors or brackets specifically designed for this purpose. Follow The manufacturer’s instructions To ensure a secure installation. This step is especially important if you have older children who may be tempted To climb on The changing table.
For more detailed instructions on how To convert a dresser into a changing table, visit Melissa Lynch’s blog post.
Features:
- Space-saving
- Budget-friendly
- Customizable
- Convenient storage
- Sturdy & secure
Converting a dresser into a changing table with drawers is not only a practical solution, but it can also be a fulfilling DIY project. As a new parent myself, I decided To convert an old dresser into a changing table for our nursery. It was a fun & rewarding experience To repurpose something we already had & turn it into a functional piece of furniture for our baby.
If you’re looking for additional inspiration or ideas for converting a dresser into a changing table, The Gem Picker provides a helpful guide with various creative options.
Conclusion
Converting a dresser into a changing table with drawers is a smart & practical choice for new parents. It allows you To repurpose furniture you already have, saving money & reducing waste. With The right materials & a little bit of creativity, you can create a functional & stylish changing table that will meet all your baby’s needs. So why not give it a try & enjoy The satisfaction of a DIY project that also benefits The environment?
To browse a wide selection of baby products, including changing tables & more, visit Ong Baby.
How To Easily Convert A Dresser Into A Changing Table With Drawers?
Converting a dresser into a changing table with drawers can be a practical & cost-effective solution for your nursery. Here’s a step-by-step guide To help you with The process:
What materials will I need for this conversion?
To convert a dresser into a changing table with drawers, you’ll need The following materials:
- Dresser
- Changing pad
- Screwdriver or drill
- Measuring tape
- Wood glue
- Screws
- Safety straps for securing The changing pad
Step 1: Prepare The dresser
Start by removing any items from The dresser drawers. Take out The drawers & set them aside. Clean The dresser thoroughly, removing any dirt or dust. You may also consider sanding or painting The dresser To give it a fresh look.
Step 2: Measure & mark The changing pad area
Measure The dimensions of your changing pad. Using a measuring tape, mark The area on top of The dresser where you want The changing pad To be placed. Make sure To leave enough space for The drawers To work properly.
Step 3: Secure The changing pad
Apply wood glue on The marked area & place The changing pad on top. Press it down firmly To ensure it sticks. For added security, you can also use screws To attach The changing pad To The dresser.
Step 4: Reinstall The drawers
Once The changing pad is securely in place, put back The dresser drawers. Test them To ensure they slide smoothly & securely.
Step 5: Add safety straps
To ensure The safety of your baby, attach safety straps To The changing pad & secure them To The dresser. This will prevent The pad from shifting or slipping while you change your baby.
Step 6: Organize The drawers
You can use The dresser drawers To store baby essentials such as diapers, wipes, clothes, & other changing supplies. Consider using drawer dividers or organizers To keep everything neat & organized.
Step 7: Personalize & decorate
Finally, feel free To personalize & decorate The dresser To match your nursery’s theme. You can add knobs or paint The dresser in a color of your choice.
Remember, always prioritize safety when converting a dresser into a changing table. Ensure The changing pad is securely attached, & never leave your baby unattended during diaper changes.
Conclusion
In conclusion, converting a dresser into a changing table with drawers is a simple & practical solution for new parents or anyone looking To optimize their nursery space. By following a few easy steps, you can create a functional & stylish changing area that not only provides ample storage for all your baby essentials but also saves you money in The process.
First, begin by selecting a suitable dresser that meets your needs in terms of size, material, & style. Consider The height of The dresser, ensuring it is comfortable for you To change your baby’s diapers without straining your back. Additionally, make sure The dresser has enough drawer space for organizing diapers, wipes, clothing, & other baby essentials.
Next, gather The necessary materials & tools To complete The conversion. This typically includes a changing pad, safety brackets or straps To secure The changing pad To The dresser, & any additional hardware needed for reinforcing The dresser’s structure or attaching The pad securely.
Once you have everything ready, start by thoroughly cleaning & preparing The dresser for The transformation. Remove any existing hardware or extras that might interfere with The changing table setup. Consider sanding or painting The dresser To match your nursery’s decor, adding a personal touch To The space.
After The preparation, you can install The changing pad onto The dresser using The safety brackets or straps. Make sure To follow The manufacturer’s instructions & test The stability & security of The pad before using it with your baby.
Lastly, organize The drawers with dividers or small baskets To keep The changing supplies organized & easily accessible. Label each drawer To ensure quick retrieval, especially during those late-night diaper changes when every second counts.
By repurposing a dresser into a changing table with drawers, you not only get a functional & versatile piece of furniture but also reduce waste by reusing an item you may already have. This DIY project allows you To create a customized changing station that fits your needs & style while saving money compared To purchasing a brand-new changing table.
In summary, with a bit of creativity & some basic tools, you can transform an ordinary dresser into a practical & attractive changing table with drawers for your nursery. Remember To prioritize safety & comfort, all while enjoying The satisfying feeling of repurposing furniture & creating a unique space for you & your baby.